> For the complete documentation index, see [llms.txt](https://en.docs.monaca.io/llms.txt). Markdown versions of documentation pages are available by appending `.md` to page URLs; this page is available as [Markdown](https://en.docs.monaca.io/products_guide/monaca_ide/deploy/non_market_deploy.md).
# Non-market App Distribution
## For iOS apps
You might want to distribute your application outside the App Store for these two purposes:
1. Testing: Before releasing your app, you want to test it as much as you can. Thus, you might also want to distribute your app to users (testers) by other ways than the App Store.
2. In-house applications: The application is made for internal use (in a company or organization) only.
{% hint style="info" %}
For in-house distribution, you will need to have an [Apple Developer Enterprise Program ](https://developer.apple.com/programs/enterprise/)account.
{% endhint %}
The differences between the Apple Developer and Apple Developer Enterprise programs regarding apps distribution:
| | Apple Developer Program | Apple Developer Enterprise Program |
| ----------------------- | ----------------------- | ---------------------------------- |
| Beta OS Releases | Yes | Yes |
| Ad Hoc Distribution | Yes | Yes |
| App Store Distribution | Yes | No |
| In-house Distribution | No | Yes |
| TestFlight Beta Testing | Yes | No |
| Team Management | No | Yes |
| App Analytics | Yes | No |
For more information about the differences between the two programs, please refer to [Choosing a Membership](https://developer.apple.com/support/compare-memberships/).
There are two ways to distribute your pre-release apps for testing:
1. using App Store Connect: requires a iOS Developer Account and takes time since it needs approval from Apple Review prior to the distribution.
2. using Ad Hoc distribution: can be done with either iOS Developer or iOS Developer Enterprise accounts. Also, it doesn’t require the approval from Apple Review.
In-house distribution is for distributing your iOS apps securely to your employees. In other words, you can distribute your app to any company devices. However, if you want someone outside of your company to test your app or restrict the distribution to specific devices, you can use Ad Hoc distribution.
Ad Hoc distribution is for distributing your apps using Ad Hoc provisioning profile to up to `100` registered devices.
Both types of distribution have the same ways of app installation. The difference is the provisioning profile.
There are several ways to install your applications outside the App Store as shown in the following sections.
### Install using Apple Configurator 2 (Mac Only)
1. Install the [Apple Configurator 2](https://apps.apple.com/us/app/apple-configurator-2/id1037126344?mt=12) program on your Mac from the App Store.
2. Connect your device to the PC.
3. Open the Apple Configurator 2 and select your device. If you device doesn’t appear, please make sure that your device is properly connected to your Mac.

4\. Click the :heavy\_plus\_sign: button and select the **Apps** option.

5\. Click the **Choose from my Mac** button and browse the `.ipa` file. Then, the app will be installed on your device.
### Install using Xcode
You can install your iOS app (`.ipa` file) via Xcode as follows:
1. Connect your device to your PC.
2. Open Xcode and go to **Window → Devices** .
3. The Devices screen will open. Choose the device you want to install the app on.
4. Drag and drop your `.ipa` file into the `Installed Apps` as shown below: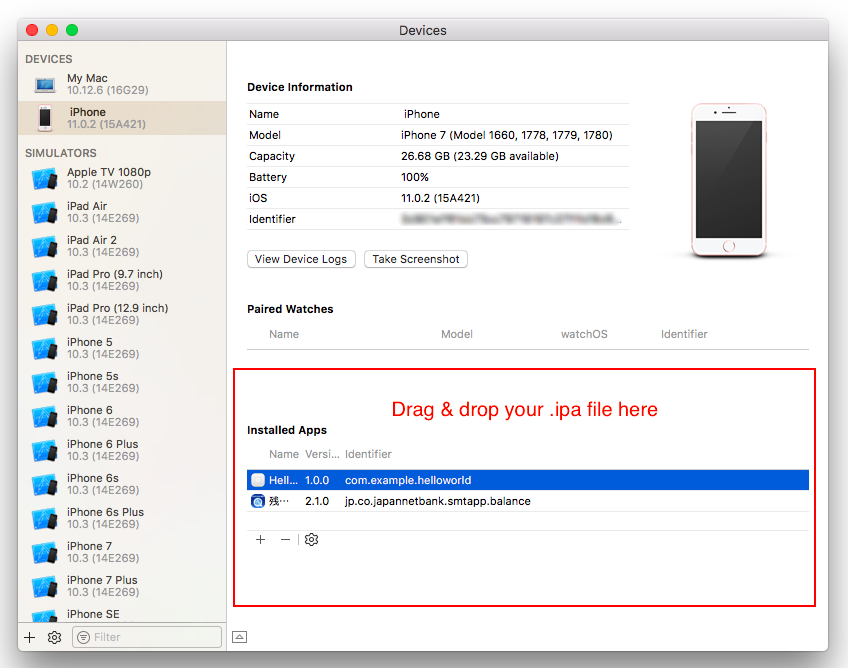
### Install using iTunes
{% hint style="warning" %}
iTunes 12.7 for Mac was released with a major change in the app. Apple has redesigned iTunes so that it focuses on sales of music, movies, TV shows, audiobooks, and podcasts. It no longer has an App Store for buying apps for your iPhone or iPad. Therefore, you can no long install your iOS App (.ipa file) through iTunes any longer.
{% endhint %}
1. Build your application with with the debug or ad-hoc build. For more details about the iOS build process, please refer to [Building an iOS App](/products_guide/monaca_ide/build/ios/build_ios.md).
2. After the build is completed, download the `.ipa` file.
3. Open iTunes and go to the `App library`.
4. Drag and drop the downloaded `.ipa` file into the `App library`.
5. Connect your device to iTunes and go to your device apps.
6. Click **Install** and then **Sync**. See the example below:

### Install using OTA deployment
OTA (Over-The-Air) deployment enables you to install your built apps via HTTPS.
1. Build your application with either debug, ad-hoc or in-house build. For more
details about the iOS build process, refer to [Building an iOS App](/products_guide/monaca_ide/build/ios/build_ios.md).
2. Download the `.ipa` file after the build completes.
3. Upload the `.ipa` file to the site you want.
4. Create a `.plist` file for this built application. The `.plist` file should look like this:
```markup
items
assets
kind
software-package
url
https://www.anysite.com/application/your_app.ipa
metadata
bundle-identifier
com.example.helloworld
bundle-version
1.0.0
kind
software
title
HELLO
```
{% hint style="info" %}
While creating `.plist` file, please pay attention to these points:
* `.plist` file must be accessible via https protocol.
* update bundle-identifier with the App ID.
* specify correct path to the `.ipa` file.
{% endhint %}
5\. Upload the `.plist` file to the site you want. Make sure this file can be accessed via HTTPS protocol.
6\. Create a webpage embedded link to the uploaded `.plist` file using a special `itms-services://` protocol.
```markup
Download
```
7\. After you get the link, use your device to access the link. Then, you will be prompted to install the application.

## For Android apps
You might want to distribute your application outside the official markets such as Google Play Store and Amazon AppStore for these two purposes:
1. Testing: Before releasing your apps, you want to test
them as much as you can. Thus, you might want to distribute your
apps to users (testers) by other ways than the official
markets.
2. Personal/Internal Purpose: The application is made for your own
personal or internal use.
### Install using the ADB command
ADB (Android Debug Bridge) is a tool that enables you to use terminal commands on your phone.
Prerequisite:
1. Install Android SDK on your computer
2. Locate the ADB path after the Android SDK installation
3. Enable USB Debugging and allow the installation of the apps from sources
other than the Play Store on your device.
To install your built app via the ADB command:
1. Build your application with the debug build. For more details about
Android build process, please refer to [Building for Android](/products_guide/monaca_ide/build/build_android.md).
2. After the build is completed, download the `.apk` file.
3. Plug your device with a USB cable to your computer.
4. Run the below command on your computer in the command window. Make sure to use the correct path to your `.apk` file.
```markup
adb install foo.apk
```
### Install using a direct link
This is simply an installation through a direct link to your `.apk` file:
1. Build your application with the debug build. For more details about
Android build process, please refer to [Building for Android](/products_guide/monaca_ide/build/build_android.md).
2. After the build is completed, download the `.apk` file.
3. Upload the downloaded file to any site you want.
4. Go the link of the uploaded file from your device. Then, you will be prompted to install the application.
{% hint style="info" %}
Please make sure make these settings on your device beforehand:
* Enable USB debugging.
* Allow installation of the apps from sources other than the Play Store.
{% endhint %}
See Also:
* [Building for iOS](/products_guide/monaca_ide/build/ios.md)
* [Building for Android](/products_guide/monaca_ide/build/build_android.md)
* [Google Play Distribution](/products_guide/monaca_ide/deploy/google_play.md)
* [App Store Distribution](/products_guide/monaca_ide/deploy/appstore.md)