Overview
Monaca Cloud IDE is a browser-based development environment. Right on your web browser, all your Cordova development can be done without any setup.
On this page, we will describe the Graphic User Interface (GUI) of the Monaca Cloud IDE.
Menu bar
The main menu bar contains the following submenus:
Menu Item
Description
File
Shows the File sumbmenu.
Edit
Shows the Edit submenu.
View
Shows the View submenu.
Run
Shows the Run submenu.
Build
Shows the Build submenu.
Project
Shows the Project submenu.
Configure
Shows the Configure submenu.
Backend
Opens the Monaca Backend in a new window.
Help
Shows how to find help during the development.
File
Menu Item
Description
New File
Creates a new file.
Save
Saves the currently open file.
Save All
Saves all the currently open files.
Upload
Uploads the files in the current folder.
Edit
Menu Item
Description
Undo
Undoes the latest action.
Redo
Redoes the previous action.
Search
Searches for a string in the currently open file.
Replace
Replaces a found string in the currently open file.
Search All Files
Searches through all the project files.
Comment
Comments out/in the current line.
View
Menu Item
Description
Debugger Tab
Shows/Hides the debugger tab
Reset Layout
Resets the IDE's layout to the default arrangement.
Run
Menu Item
Description
Show Preview Tab
Opens the previewer.
Run on Device
Runs the project on the Monaca Debugger.
Setup Monaca Debugger
Installs the Monaca Debugger on your device.
Build
Menu Item
Description
Build App for Android
Builds the app for an Android device.
Build App for iOS
Builds the app for an iOS device.
Build App for Windows
Builds the app for a Windows device.
Build History
Shows the build history of the current project.
CI History
Shows the continuous integration history of the current project.
Project
Menu Item
Description
Commit
Commits the local changes.
Show Commit History
Shows the commits history from Monaca Cloud IDE.
Pull
Pulls the remote changes.
Push
Pushes the local changes to the remote server.
Show Remote History
Shows the commits history in the remote server.
VSC Configure
Configures the remote repository.
Invites other Monaca users to join the project.
Export
Exports the project.
Publish
Makes the current project public (see Publish Project).
For more information to enable vision control on your project, please refer to Version Control.
Configure
Menu Item
Description
App Settings for Android
Configures Android app’s information (see Configure Android App).
App Settings for iOS
Configures iOS App’s information (see Configure iOS App Settings).
App Settings for Windows
Configures necessary information to build a Windows app (see Configure Windows App Settings).
Cordova Plugin Settings
Enables/Disables Cordova plugins in the current project (see Cordova Plugins).
JS/CSS Component Settings
Adds/removes JavaScript and CSS libraries to/from the current project (see JS/CSS Components).
Service Integration Settings
Integrates services to Monaca projects in the form of plugins (see Service Integration).
Continuous Integration
Automates building and deployment cycles (see Monaca CI).
Deploy Service
Adds/Removes deployment services for Monaca CI (see Deployment Services).
Workspace Configuration
Configures the appearance of the code editor.
Publish a project
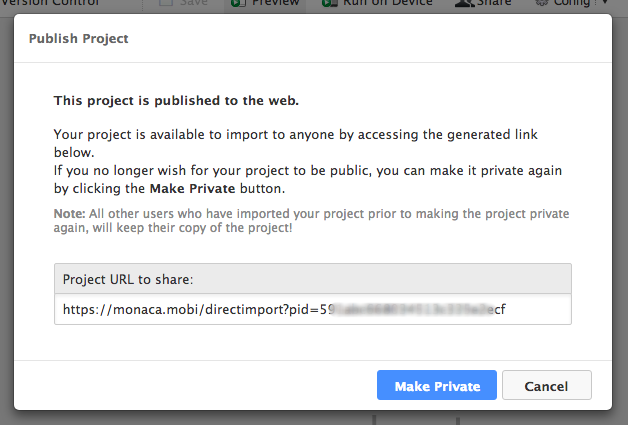
This feature allows you to make your project available to other users by sharing the link generated after publishing your project. By accessing the generated link, users can get a copy of their own on their account. All changes made in the copies are not transferred to the original, so there will be no fear of someone messing up the original.
Publishing your project is really easy and done by following these steps:
From the Monaca Cloud IDE menu, go to Project → Publish.
Click Publish.

3. Use the generated link to share your project.

If you no longer wish for your project to be available, you can make it private again by clicking the Make Private button that appears after publishing your project.
Direct import
With this feature, we allow Monaca users to directly import published Monaca projects or projects from a given URL directly by just accessing a link. Upon accessing the link, the users will be forwarded to the following screen (if signed in), whereby just clicking the import button the project will be imported onto their account.

Debugger tab
Once Monaca Debugger is connected with Monaca Cloud IDE, you can do console debugging as well DOM inspection in this panel. For more information, please refer to Monaca Debugger with Monaca Cloud IDE.

Preview log tab
Preview Log tab is a terminal window for running a HTTP service to provide content in the previewer.

Previewer
The previewer provides an overview of your app in real-time. You can also interact with the previewer as if it is running on an actual device with the limitation of executing the specific device’s functionality (such as camera, contact and so on) and cross-origin network AJAX request. Along with the Monaca Debugger, you will have effective and efficient experiences during the app development.
In this tab, you can:
Refresh the previewer.
Change the display of the device's screen in that tab. You will see a drop-down list of different devices such as iPad, iPhone, and Pixel. You can change the orientation of the screen as well.
Detach/attach the previewer.

Previewer limitations
When using the previewer, you should be aware of the following limitations:
Cordova plugin APIs are not available.
Ajax requests will fail because of the Cross-origin restriction. However, it can be done if server-side scripts return
Access-Control-Allow-Originheader (i.e., Cross-Origin Ajax Request is permitted).Viewport appearance may differ from real devices.
Share
The usability of this function depends on your Monaca subscription plan. For more information, please refer to Monaca Subscription Plans .
The Share function allows you to:
Manage the team: add/remove members to the shared project.
Share the source code with multiple people (members are assigned as developers). There are 3 ways to do it:
The easiest way is to use Monaca Cloud's Team Management function. Then, two or more people can open the same project in different Monaca Cloud IDEs. However, if there is any conflict while updating the project, the previous version of the project will be overwritten.
Another way is to set up a version control system and do the
local development using Monaca Localkit or Monaca CLI. This requires a higher skillset, but it is more collaborative.
Let multiple people to test the project (members are assigned as
testers).
If you want to join a team and edit the project files, you need to subscribe to a valid plan. Otherwise, you can only join as a tester. Please refer to Monaca Subscription Plans.
Sharing a project
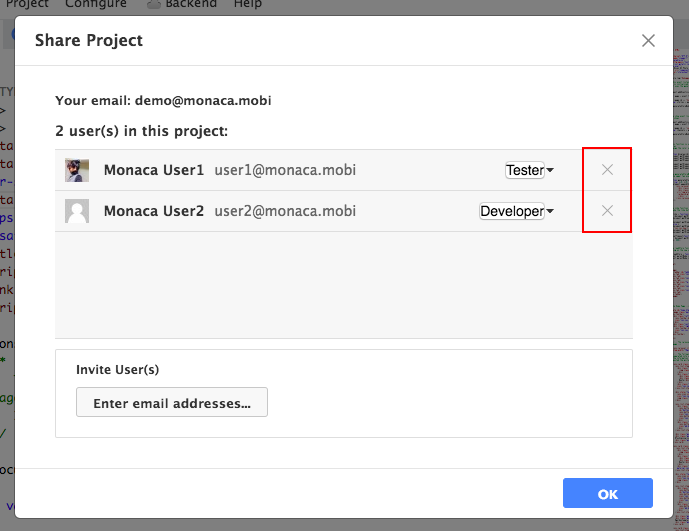
In order to share and manage the members of your project, please do as follows:
From the Monaca Cloud IDE, go to Project → Share .
The Share Project dialog will appear. To add a member, input the emails of your team members. Please enter one email address per line. You can also assign the role of each member as a developer or a tester by choosing from the drop-down menu. Then, click the Add User button to send the invitation to them.

3. To remove a member from the project, just click the ✖️ icon at the end of the row and then click OK.

Code editor
Monaca uses the Monaco editor because of various reasons such as:
a robust auto-completion system that can be expanded with the use of a language server that provides support for TypeScript, HTML, JavaScript and Onsen UI. And more to come such as React and Vue.
basic syntax colorization
rich intelliSense & validation
Please refer to Editor Shortcuts for the list of all the shortcuts available in the Monaca code editor.

If you want to search within the current editor, press Cmd+F or Ctrl+F. The following dialog will appear:

Last updated